|
|
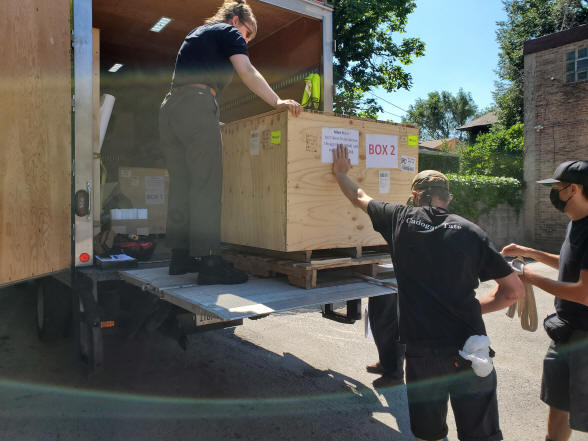
Arrival to the USA of the Astronomical skeleton clock, reassembly - July/August 2022 One might expect that this part of the project, the delivery via airfreight would be short and straightforward. But this was not the case. I have used fine arts logistics company for many years to bring clock for my collection, mainly from Europe without incident. Unfortunately they did not have an office in Australia and partnered this delivery with an Australian fine arts logistics service. To make a long story short the Australian partner poorly organized this and what should have taken at most a few days stretched out to a month. The travel was unduly circuitous and the crates were stuck at several airport storage facilities for days or weeks without anyone knowing exactly where they were are what the ETA was. It was a frustrating and at times a worrisome exercise. Relief only came once the crates arrived at O'Hare airport and were safely back in the hands of my regular carrier on the 18th. The process through US Customs went off without a hitch. No opening of the crate or questioning of the categorization under the Harmonized Tariff Schedule of the United States. Not sure they even received or read the legal opinion I paid so dearly to have written from the law firm of Mayor Brown in Washington D.C. A copy which was given to the import broker.
The main double-walled crate is opened at my carrier's warehouse to inspect for damage. Buchanan's careful packing has paid off. Packing is 95% of the insurance against damage during transport of any delicate object. The long travel nightmare is over! Delivery to me is scheduled for the next day. July 19 - Arrival day! The truck will have to deliver from the access behind by home to the garage. I removed the cars and cleaned up the floor and began staging what would be needed.
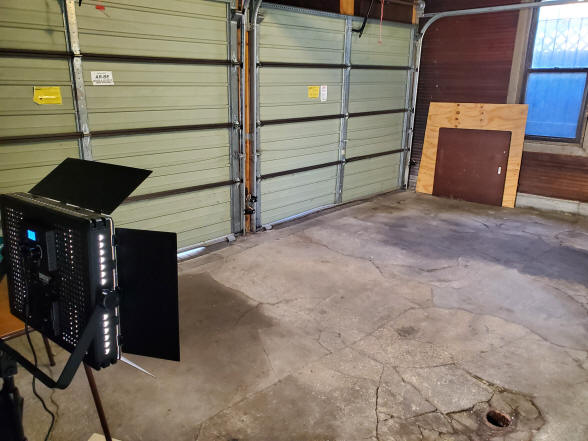
In the first photo the garage is cleared and LED klieg lights are placed for better lighting. The truck is due for 11:30 AM. The weight of the two crates are listed on the airway bill at 967 kg or 2132 lbs. The net weight of the clock plus parts is about 91 kg or 200 lbs. Next a table is set up just outside the back door to give the movers a rest before the tedious and somewhat risky procedure of getting the heavy and delicate machine up a half-flight of stairs to the ground level of my home.
The cage is freed from the aluminum base plate and carefully lifted off. If one looks closely at the next photo the carry frame has been assembled and secured to the base frame. This allows all four movers to grasp the machine which is about 220 lbs. at this point the machine is still attached to the aluminum plate and 2.5" thick aluminum block and carry frame. It is bulky, fragile and must not touch anything. Next it is set upon the two concrete blocks on the bottom of the photo to allow for space beneath to use a wrench to free up the clock from the aluminum plate and block from below.
Ooops! The first mishap. A dual wheel set is found tangled up inside the machine. Next the part rescued and set aside to be put back into place at a later date. The chaton that secured it had come away from the frame allowing it to fall out. That chaton was later found on the aluminum base under the machine.
In the first photo one can see the utility of the carry frame for moving the machine. Next it is set upon the staging table until the next step.
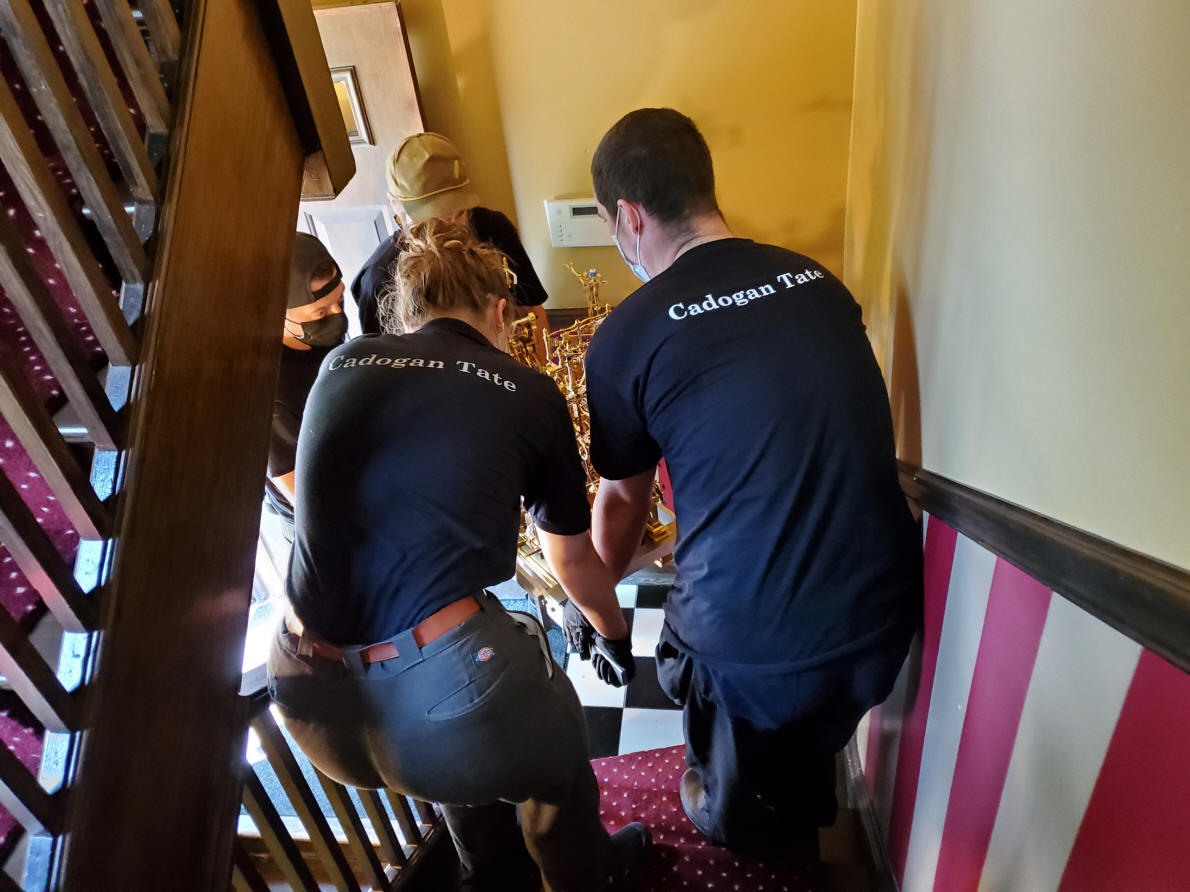
To be sure that there was a maximum amount of space to bring the machine through, a wood coat rack was removed from the staircase wall. Next it is brought into the house through the very narrow rear doorway. Note the square banister post just waiting to grab something.
Here is the most difficult part of the move, what I call "threading the needle". The movers have to maneuver the machine around a narrow 90° angle and begin to negotiate the staircase upward. Don't touch the bannister post! This was my maximum moment of trepidation.
Further up the narrow staircase. Next into the dining room.
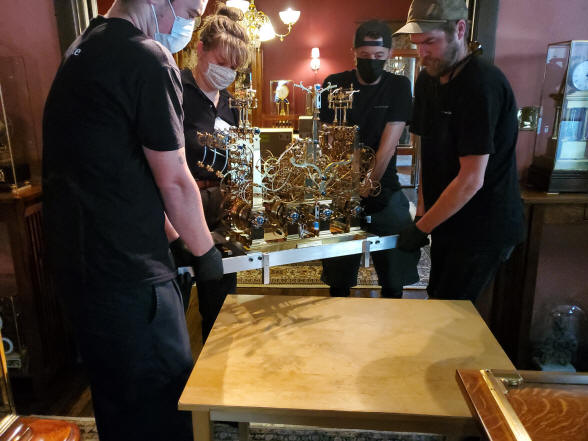
Finally the machine is put to rest on top of a temporary table in the living room. Next it is transferred to the custom table. Unfortunately I did not photograph the 2.5" aluminum block and wood surround. That block is needed to be sure the base of the clock is resting upon a perfectly flat and sturdy surface. This is critical because the base is made from four pieces and if resting on an uneven surface, the weight of the clock could cause deflection between the joints causing a racking of the wheel pillars attached to the base resulting in a misalignment of the wheel works causing a seizing up of the mechanism resulting in catastrophic failure of the machine. The carry frame is still attached to the base frame.
In the first photo the carry frame is carefully removed and in the second photo the clock is at rest on the table in its new home.
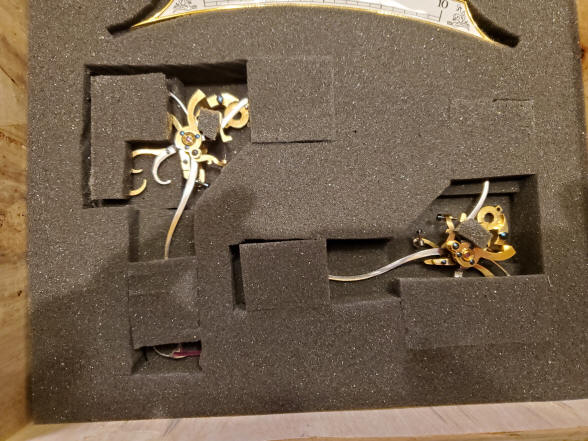
These two photos show the thirteen small crates that were in the second crate. These contain the complication modules, miscellaneous parts and tools. Begin reassembly. The next day I had moved the LED klieg lights into the area around the clock. The temporary table was set up next to the clock table for staging of tools and parts.
Will I be up to the task???
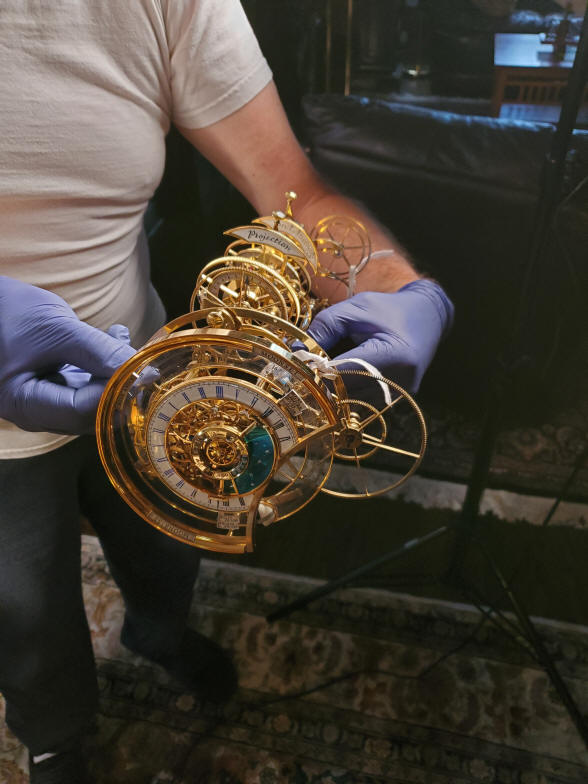
Buchanan had provided a complete set of tools. Most were not needed for the immediate task of reassembly, but were provided for any of the fasteners in the machine. Although many of these look like ordinary screwdrivers the tips were ground thinner. One of Buchanan's signature techniques is to have very thin slots in all of the screws. Others are very thin wheel rims and spokes, the latter besides being elegant also lessens mass, which in a machine of such complexity is important to conserve input energy. The photos below are merely a few of those taken during the reassembly and are not meant to be comprehensive. The entire process took two weeks. There was also a number of 'bugs' that had to be addressed and this took several more weeks. I will say that none of the bugs were serious and the clock, once assembled to the point where it could run, took off immediately. As Buchanan said often to me "It is a runner." and indeed it is.
The first step was to remove all of the tie downs that were located throughout the machine. These were needed to keep any movable parts from flopping around during transport. Most of the time I needed a fine razor-knife blade to do the job; it felt like I was removing sutures. Next photo shows the clock freed of the tie downs.
The first subassembly to be addressed was the installation of the
pendulum balances. For the most part each of the thirteen smaller crates
contained one sub-assembly, but others like this one, also contained
additional, non-related parts. Each box was labeled on the outside even down
to which screws to remove. Buchanan was careful to list all the contents in
each box. The complexity of these components made them one of the more, but
not most difficult assemblies to attach.
Before the balances could be installed, the cross drive, consisting
of five large wheels which carries a drive from the time train to the
quarter strike train and crossing the center celestial train must be
removed. This train of wheels run through the area of the lower balance’s
diagonal brace, first photo. This train transfers rotation of once per hour
from the time train. But unlike a regular clock where the information from
the time is usually connected to the dial hands and thus can be set via
those hands and which also trip the strike train, the dial hands are driven
but have no setting or trip function. So when one wants to synchronize the
time and strike trains the operator must move the time setting knob which
rotates the cross drive until the strike train is just tripped. The dial
hands are then manually set to match what is indicated by the strike. Once
set it remains in synch. Unusual, but it also eliminates any need for
synchronization between the train wheels. The second photo shows the
insertion of the right hand balance. 
 The first photo shows the cross drive diassembled. Next I am installing the left hand balance.
The first photo are the upper set of balance springs. Next the springs are installed.
Note the detail in the
spring attachment points, small machined parts, tiny blued screws and steel
bands running over jeweled pulleys to the vernier scale adjustment scale.
The pair
of escape wheels and their bevel wheel drives come as a unit. The escape
wheels counter-rotate in relation to each other so there are two bevel
drives and inner and outer escapement arbors.
The first photo before and the second after insertion of the escapement
wheel assembly.
The escapement is held by a set of eight vertical antifriction wheels seen
in the first photo just above the sector dial. Next the escapement assembly
rests upon the anti-friction wheel set. The entire escapement is simply
placed upon the ant-friction wheel set, no other attachment needed. The
bevel wheel set is held steady by an additional set of horizontal
antifriction wheels that keeps them in mesh with the mating bevel pinions
driven from the Wagner remontoire set.
The escapement pallets as packed. Next the left escapement is installed upon the left balance. It should be noted that there needed a bit of an adjustment needed to get the pallets centered on the escape teeth. This is accomplished by a set of knurl knobs on the both ends of each pendulum’s central pivot arbor. This arbor is hollow and there is a thin wire strip that runs through it with each end attached to a knurl knob. By adjusting the knobs the entire pendulum assembly can be moved forward and back and thus moving the escapement pallets to match the wheel teeth. The escapement wheels are not adjustable. It is critical that one moves both of the knobs by the same number of turns and in the same direction or you risk twisting and possibly breaking the central wire strip resulting in the pendulum no longer being able to stay steady on the designated place.
Next the lower balance
balls are attached, they are heavy at seven pounds each. One must be careful
not to touch the clock base to avoid scratching. The next photo shows the
bottom balance ball pair installed. The upper locking bracket must first be
removed to install the top pair.
This photo was taken in
moments after I started the clock for the first time. It did start right up!
I had yet to learn about how to set the escapement pallet pairs correctly,
but still it did run.
A view of the right and left sides of the machine.
These two photos show
detail of the zodiac signs on the tellurian dial. Securing the mean time and
tellurian dials presented some challenges. Again some of this was my not
quite understanding how it should be done and that the task was exacting and
my reluctance to use any kind of pressure when sometimes this is necessary. 

The calendar is unpacked. Note how carefully
it has been packed in a double box with interconnecting foam cushioning.
Buchanan provided a video vignette of the way each box was packed as well as
how to unpack and install each separate component.
Sun/Moon assembly is unpacked, and installed.
The tellurion is unpacked. The Earth globe was packed separately since ivory is a heavy material and it is suspended from a rotating armature.
This photo shows the rutilated citrine color and shimmer from the embedded rutile needles to represent the Sun.
The first photo shows the clock before installation of any of the complication modules. Next the mean time dial and hands are secured.
Here the calendar is installed above the mean time dial. Next the Sun/Moon complication is installed on the upper right of the clock. Complete reassembly, the project is finished - August 2022
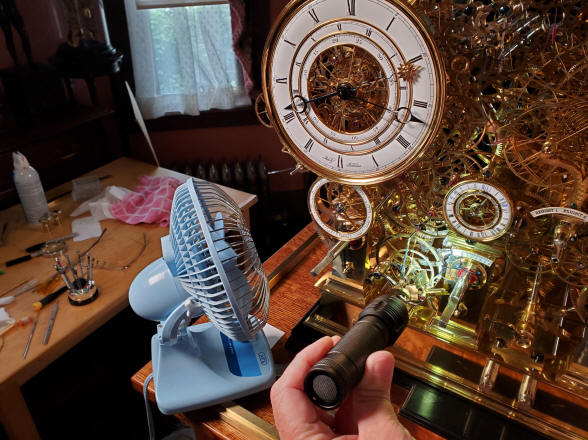
I used a small brush to clean off any dust. In the background is a small fan to blow the dust away from the assembly. A high intensity flash light makes the dust easy to spot even when there are only a few particles. Even though the clock was shipped in a dustproof container, one has to remember that it was built over a period of fifteen years. Most everything was taken apart and polished beginning in 2019, but still many assemblies have been exposed to the open air for three years. Buchanan had provided a wood stand to mount the tellurion on. The second photo shows the right hand sector of the machine.
The fan is most useful when cleaning off parts deep within the machine. Instead of the dust falling downward and deeper into the complex architecture the dust is blown through and out. This works better than compressed ir since the pressure can be dangerous for parts that are movable. Also the spread of the air flow is very narrow, while the fan has a much broader area.
The orrery module is unpacked. In this instance the packing was rather complicated so I used one of the vignettes Buchanan had provided on my laptop. Looks like we have matching gloves! Below was the twelve inch dial ring.
The area of the clock before and after the installation of the clock's crown, the orrery.
The last module, the planisphere is unpacked. Notice in the second photo how carefully the inner box is shaped to the contours of the module with felt covering the interior of the box in all areas which would come in contact with the module. This tightly fitting design was needed because the planisphere has a large, heavy, thick brass base, so it had to be kept from moving within its enclosure. There also was no area where a clamp could be secured to the module to hold it in place as was done with the other modules.
This video shows the rear view of the planisphere using the nearly frictionless bearings used throughout the Astro-skeleton project. Since the machine has over 500 wheels, friction is our constant enemy. Only though the use of ceramic, oil free bearings can we accomplish the drive of this machine with a reasonably sized motor spring.
After the planisphere was installed, the installation of the complication modules was finished and reassembly was complete. There would still be several bugs to deal with and Buchanan was generous with his time with emails as well as several WhatsApp video calls, some lasting an hour or more to help me diagnose and solve these issues.
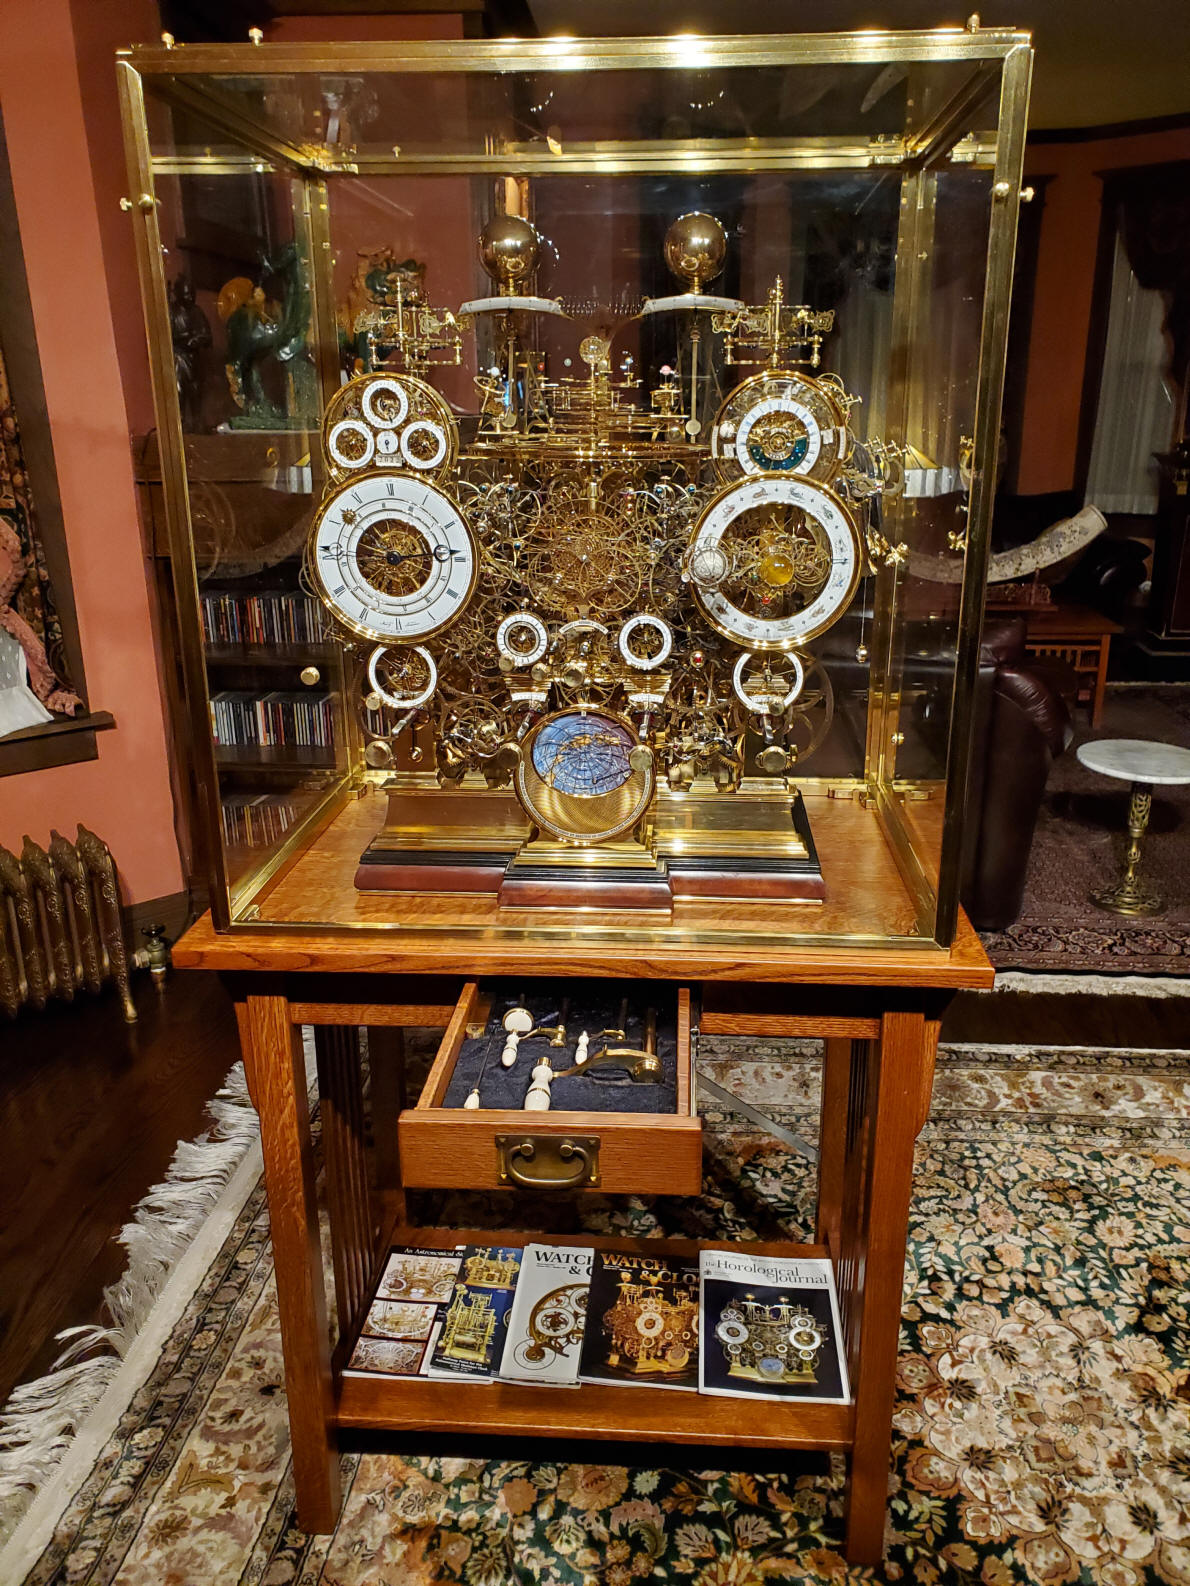
The clock is finished, in its case, on the table and with the drawer opened revealing the operator's tools. On the lower shelf below are articles published in various horological magazines, not the complete set, just those where the clock made the front and/or rear covers.
The Astronomical skeleton clock with its smaller sibling. These are amongst the most complex skeleton clocks made.
At long last the project is finished and so I celebrate with a well deserved cocktail. Buchanan had his party last June when the crates left his shop, now it is my turn!
This is one of the few videos that you can actually hear some of the mechanism.
The crates are all safely stored and await the next owner/caretaker of this magnificent creation. |


 The
first photo shows the tellurion installed, the next photo shows the orrery.
The
first photo shows the tellurion installed, the next photo shows the orrery. 


![]()
![]()
![]()